Tips to Make Colorful Link

With tips to create a link to change the colorful link, we can change our blog link changes color like a rainbow when the cursor / mouse pointer over a link us. Thus we can make our blog more beautiful and attractive. let's try ...


How to create colorful link:

1.     login to your blogger dashboard.
2.     Choose Design> Page Elements> Add gadget (HTML / JavaScript).
3.     Copy the code below and paste javascript gadget.
<script src='http://hbhost.googlecode.com/files/rainbow-link.js'/>
4.     Done and please diliat results.
5.     way is my friend can put this script in the template exactly above the code </ head> , go to the Edit HTML, put the script and save your template.
Good luck :-).


The Best Technic

Drop Down Menu For Blogger

Drop Down Menus are great for adding multiple links in your blog and yet they require very little space space. In addition it makes the site more user friendly and gives it a more professional look. I am going to show you how to add a customizable drop down menu to your blogger blog.
Drop Down Menu Preview:
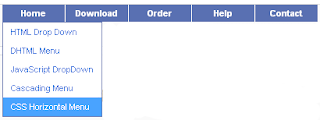
drop down menu A simple Drop Down Menu For Blogger

Follow these steps to add a drop down menu to your Blog:
1. Go to Design->Edit Html
2. Download Full Template (This is to backup your template, so that you don’t lose any data).
3. Check the Expand Widget Templates
4. Now search for the following code:
</head>
5. Just place the following code before the code above.

<style>
#sddm
{ margin: 0;
padding: 0;
z-index: 30}

#sddm li
{ margin: 0;
padding: 0;
list-style: none;
float: left;
/*Font of menu top*/
font: bold 11px arial}

#sddm li a
{ display: block;
margin: 0 1px 0 0;
padding: 4px 10px;
/*width of each menu top*/
width: 60px;
/*background color of main menu*/
background: #5970B2;

/*text color of main menu*/
color: #FFFFFF;
text-align: center;
text-decoration: none}

#sddm li a:hover
{

/*background color of main menu on hover*/
background: #49A3FF}

#sddm div
{ position: absolute;
visibility: hidden;
margin: 0;
padding: 0;

/*background color of drop down menu */
background: #FFFFFF;
/*border of the drop down menu*/
border: 1px solid #5970B2}

#sddm div a
{ position: relative;
display: block;
margin: 0;
padding: 5px 10px;
width: auto;
white-space: nowrap;
text-align: left;
text-decoration: none;
/*background color of each menu element*/
background: #FFFFFF;
/*text color of each menu element*/
color: #2875DE;
/*font of each menu element*/
font: 11px arial}

#sddm div a:hover
{
/*background of each element on hover*/
background: #49A3FF;
/*font color of each menu item on hover*/
color: #FFFFFF}
</style>
<script type='text/javascript'>

var timeout = 500;
var closetimer = 500;
var ddmenuitem = 0;

// open hidden layer
function mopen(id)
{
// cancel close timer
mcancelclosetime();

// close old layer
if(ddmenuitem) ddmenuitem.style.visibility = &#39;hidden&#39;;

// get new layer and show it
ddmenuitem = document.getElementById(id);
ddmenuitem.style.visibility = &#39;visible&#39;;

}
// close showed layer
function mclose()
{
if(ddmenuitem) ddmenuitem.style.visibility = &#39;hidden&#39;;
}

// go close timer
function mclosetime()
{
closetimer = window.setTimeout(mclose, timeout);
}

// cancel close timer
function mcancelclosetime()
{
if(closetimer)
{
window.clearTimeout(closetimer);
closetimer = null;
}
}

// close layer when click-out
document.onclick = mclose;
</script>


6. Customize the drop down menu(optional):
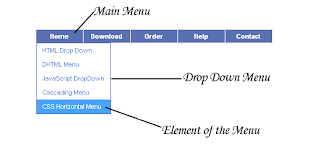
Customize Drop down menu A simple Drop Down Menu For Blogger
You can customize the menu according to your blog. This is optional and use it only if you want a different look than the one already available.
The menu consists of three sections as shown in the figure:

1. Main Menu
2. Drop Down Menu
3. Element of Drop Down Menu
In the code you will find some comments. Below the comments you have some editable code.
Here is the explanation of some of the attributes used in the code:
Background: #XXXXXX
This attribute decides the background of the part and XXXXXX is the hex code of the color. You can change the background of each of the three parts.
Color:#XXXXXX
The color attribute decides the color of the text and XXXXXX is the color hex code.
You can get color hex codes from these online color choosers

ColorSchemer
ColorPicker

width: 123 px
The width determines the width of each element. You can increase or decrease the width according to your choice.
7. Adding the Menu:
a.Go to Design>Page Elements
b.Then click on Add Gadget
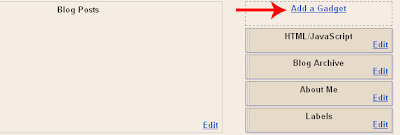
Sidebar add gadget A simple Drop Down Menu For Blogger

c. Then select HTML/JAVASCRIPT

d.Then Add the Following code

<ul id="sddm">
<li><a href="#"
onmouseover="mopen('m1')"
onmouseout="mclosetime()">Home</a>
<div id="m1"
onmouseover="mcancelclosetime()"
onmouseout="mclosetime()">
<a href="#">HTML Drop Down</a>
<a href="#">DHTML Menu</a>
<a href="#">JavaScript DropDown</a>
<a href="#">Cascading Menu</a>
<a href="#">CSS Horizontal Menu</a>
</div>
</li>
<li><a href="#"
onmouseover="mopen('m2')"
onmouseout="mclosetime()">Download</a>
<div id="m2"
onmouseover="mcancelclosetime()"
onmouseout="mclosetime()">
<a href="#">ASP Dropdown</a>
<a href="#">Pulldown menu</a>
<a href="#">AJAX Drop Submenu</a>
<a href="#">DIV Cascading Menu</a>
</div>
</li>
<li><a href="#">Order</a></li>
<li><a href="#">Help</a></li>
<li><a href="#">Contact</a></li>
</ul>
<div style="clear:both"></div>

Note: Replace # by the link of the item and if you want to add the menu, say the third element.
Replace <a href=”#”>Order</a> by the following code:
<a href="#"
onmouseover="mopen('m3')"
onmouseout="mclosetime()">Home</a>
<div id="m3"
onmouseover="mcancelclosetime()"
onmouseout="mclosetime()">
<a href="#">HTML Drop Down</a>
<a href="#">DHTML Menu</a>
<a href="#">JavaScript DropDown</a>
<a href="#">Cascading Menu</a>
<a href="#">CSS Horizontal Menu</a>
</div>


This is for the third menu, for the fourth replace each m3 by m4
f. Save the Gadget and the work is over. The Drop Down menu is live!


The Best Technic

Tips to Creating an Add to Cart PayPal button

How to turn your PayPal Website Payments Button into an "Add to Cart" button for use with PayPal's Shopping Cart.

Note: Manipulating the PayPal Website Payments button takes some familiarity with HTML. If you are not comfortable editing your HTML code by hand, please create new buttons via the Shopping Cart Button Factory.

Before you begin:

Unlike a PayPal Website Payments button, where all fields are optional, the PayPal Shopping Cart requires the item_name and amount fields. If you did not use either of these fields when you created your PayPal Website Payments button, please create new buttons via the PayPal Button Factory.

The current HTML code for your PayPal Website Payments button should look similar to this:

<form method="post" action="https://www.paypal.com/cgi-bin/webscr">
<input type="hidden" name="cmd" value="_xclick">
<input type="hidden" name="business" value="payments@yoursite.com">
<input type="hidden" name="item_name" value="Baseball Hat">
<input type="hidden" name="item_number" value="123">
<input type="hidden" name="amount" value="5,95">
<input type="hidden" name="shipping" value="1,00">
<input type="hidden" name="shipping2" value="0,50">
<input type="hidden" name="handling" value="2,00">
<input type="hidden" name="currency_code" value="USD">
<input type="hidden" name="return" value="http://www.yoursite.com/thankyou.htm">
<input type="hidden" name="undefined_quantity" value="1">
<input type="hidden" name="lc" value="ID">
<input type="image" src="http://www.paypalobjects.com/en_US/i/btn/x-click-but23.gif" border="0" name="submit" width="68" height="23" alt="Make payments with PayPal - it's fast, free and secure!">
</form>

To transform the PayPal Website Payments code above into an 'Add to Cart' button:

1. Copy your Buy Now Buttons code from your website into a text editor.

2. Add target="paypal" to the <form> tag:

<form method="post" action="https://www.paypal.com/cgi-bin/webscr" target="paypal">


3. Find this line in your code:
<input type="hidden" name="cmd" value="_xclick">


4. Replace "_xclick" with "_cart":

<input type="hidden" name="cmd" value="_cart">


5. Add the following line somewhere between the <form> tags:
<input type="hidden" name="add" value="1">


6. Find the "input type=image" line in your code:
<input type="image" src="http://www.paypalobjects.com/en_US/i/btn/x-click-but23.gif" border="0" name="submit" width="68" height="23" alt="Make payments with PayPal - it's fast, free and secure!">


7. Replace the "input type=image" line with:
<input type="image" src="http://www.paypalobjects.com/en_US/i/btn/x-click-but22.gif" border="0" name="submit" width="87" height="23" alt="Make payments with PayPal - it's fast, free and secure!">


8. Your code should now look similar to the code below:
<form method="post" action="https://www.paypal.com/cgi-bin/webscr">
<input type="hidden" name="cmd" value="_cart">
<input type="hidden" name="add" value="1">
<input type="hidden" name="business" value="payments@yoursite.com">
<input type="hidden" name="item_name" value="Baseball Hat">
<input type="hidden" name="item_number" value="123">
<input type="hidden" name="amount" value="5,95">
<input type="hidden" name="shipping" value="1,00">
<input type="hidden" name="shipping2" value="0,50">
<input type="hidden" name="handling" value="2,00 ">
<input type="hidden" name="currency_code" value="USD">
<input type="hidden" name="return" value="http://www.yoursite.com/thankyou.htm">
<input type="hidden" name="undefined_quantity" value="1">
<input type="hidden" name="lc" value="ID">
<input type="image" src="http://www.paypalobjects.com/en_US/i/btn/x-click-but22.gif" border="0" name="submit" width="87" height="23" alt="Make payments with PayPal - it's fast, free and secure!">
</form>


9. Remove the original PayPal Website Payments HTML code and paste the code you just created into your website's HTML code. A PayPal 'Add To Cart' button will appear on your website instead of your original Single Item Purchase button.

10. To complete your implementation of the PayPal Shopping Cart, you will still need to add a 'View Cart' button to your website. To create a 'View Cart' button, create a regular 'Add to Cart' button on the PayPal Shopping Cart Button Factory. On the second page of the PayPal Shopping Cart Button Factory, you will find the code for your 'View Cart' button.

The Best Technic

Post Background Color Background Image

Different background picture for each post and each post appear in different color background. Do you know that you can have your each blog post displayed in various styles with different background colours or different background images? Yes it’s true you can show individual blog post in colored background or with different image background. Implementing this latest blogger tricks you can make your blog stand unique in various aspects. Let’s say for example, if you accept guest posts and have multiple authors contributing articles to your blog, this proves an easy way to differentiate the post appearance according to individual author. Following this blogger tips you can also make a specific post stand-out among other hundreds and thousands of posts.
Below I have explained very carefully and in plain English. I believe you will enjoy reading this blogger unique trick and work with the codes for giving your blog a unique look.
Each Post in Different Color or Different Background Images.
...............................................................................................................
Instructions to Note
...............................................................................................................
Let me also make you clear that there in no need to back up the template codes of your blog. We will not work with template instead we will go to regular create a new post option in blogger. This blogger hack is done by wrapping your Post content into a "div" element. You can apply these setting to your already published posts too and you may change, remove it at any point of time.
...............................................................................................................
Code for Changing Color of the Post Background in blogger
...............................................................................................................
<div style="background:#FFE1FF; padding:5px 8px 5px 8px;">
Your post content goes here....
</div>

Place the purple code at the end of your blog post.
Replace the part in green with your preferred color hex value.
Place the red part of the code at the beginning of your blogpost.
Make sure you replace the part in green" Your post content goes here...." with the post content.
You can also edit padding, we have added some padding so the text does not move too close of far away from the borders.

...............................................................................................................
Code for placing Background image behind Post in blogger
...............................................................................................................
<div style="background:url(URL ADDRESS OF THE PIC) no-repeat;">
Your post content goes here....
</div>

Place the purple code at the end of your blog post.
Replace the part in green with the URL of the image.
Place the red part of the code at the beginning of your blogpost.
Make sure you replace the part in green" Your post content goes here...." with the post content.
You can also edit no-repeat, we have added no-repeat, so the image does not repeat itself.
If you use repeat you can use small pattern images so that it repeats itself to cover the whole post area.

...............................................................................................................
Here's the Example on How to Place a Code:
...............................................................................................................
<div style="background:#FFE1FF; padding:5px 8px 5px 8px;">
We bring you the best in blog, blogging tricks and tips. thebest-technic.blogspot.com provides an opportunity for bloggers to come together to collaborate, learn and experience a difference. We bring you all tutorials like Earning online, templates hack, Google Adsense tricks, free blog hosting and many more. Hope this guide will help those who are finding the way around, just like me...
</div>
............................................................................................................... 
Suggestions:
...............................................................................................................
Work with the codes in EDIT HTML Post editor.
Save code in template editor in blogger settings for future use.
If you don't want to display background color or background image than you may simply remove the code by deleting the red, green and purple codes from blog post body or settings.


The Best Technic

Submit Url Add Sites Top Searchengines Free


Submit Url Add Sites Top Searchengines Free

If you are here in this page reading the post SUBMIT BLOGS TO TOP RANKING SEARCH ENGINES FOR FREE then I believe that you would also be interested in reading the post SEO. If you are interested in getting much visitors or consumers to your blog then you are in right page. You can manually submit your blogs, submit websites, submit webpages in major search engines like Google, Yahoo, Alexa, Bing and many more.
If you want web visitors to easily spot your blog, you should submit blogs to High Rated Search Engines. We have provides lists of url of several Search Engine. Click on the link provided to visit submission page directly. Now fill up the form to classify you blogs/websites.
Please take care that Search Engines will not index your blog/website if you provide wrong details. Do check once few details listed below before submitting site or adding URL to top ranking search engines.
...............................................................................................................
Searchengine Submission Do's And Dont's
...............................................................................................................
1. Make sure the Url you are submitting is correct and not broken. 
2. It contains no phonographic contents.
3. No hacking tutorials.
4. Do not submit your URL more than once a month.

(FOR MORE DETAILS PLEASE GO THROUGH TERMS AND CONDITIONS OF RESPECTIVE SEARCH ENGINES)
We offers our loyal visitors an option where they can do manual submission of their url on the major search engines which accept web sites, webpages, blogs,forums. So hurry and submit url to Bing, Submit Url to Alexa, Submit Url to Yahoo, Submit Url to Google absolutely free.

...............................................................................................................
Submit Your SiteInstantly
...............................................................................................................
 
Manually Submit Url to Top Ranking Search Engines
"BING"
SUBMIT NOW


"ALEXA"
SUBMIT NOW


"YAHOO"
SUBMIT NOW


"GOOGLE"
SUBMIT NOW

SUGGEST US
SUBMIT NOW
NOTE: Remember thousands of blogs, websites are added to different Search Engines every day, so you need to wait couple of weeks for you blogs/websites to be visible in a Search Engine's indexed. Submit the main page of your site only. The rest of your site will be crawled by the search engines.

...............................................................................................................
Other Search Engines List
...............................................................................................................
 In addition to this you can also submit your site to be listed in the below Search Engines


  • All the Web
  • Alta Vista
  • AOL
  • Beauco Up!
  • Clusty
  • CurryGuide
  • Dogpile
  • Excite
  • FamilyFriendly
  • Fazzle
  • Find Info
  • Galaxy
  • GigaBlast
  • Go.com
  • Hotbot
  • IceRocket
  • Info.com
  • InfoGrid
  • InfoSpace
  • Internet Sleuth
  • Ixquick
  • iZito
  • Kanoodle
  • Kartoo
  • Lycos
  • Mamma
  • MetaCrawler
  • MetaEureka
  • Netscape
  • One Page MultiSearch  
  • Proteus
  • ScrubtheWeb
  • Search Hippo
  • Search theWeb
  • Search.com
  • SurfWax
  • Teoma
  • Turbo10
  • WebCrawler
  • ZapMeta
  • Highway 61
  • 37.com
  • One Seek
  • MetaSpider
  • MegaGo
................................................................................................................
Website Submission Services
................................................................................................................
There are many sites on the internet offering free website submission services to search engines. We will update this page regularly keep checking.


The Best Technic