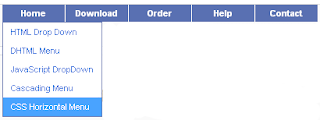
Drop Down Menu Preview:

Follow these steps to add a drop down menu to your Blog:
1. Go to Design->Edit Html
2. Download Full Template (This is to backup your template, so that you don’t lose any data).
3. Check the Expand Widget Templates
4. Now search for the following code:
</head>5. Just place the following code before the code above.
<style>
 #sddm
 { margin: 0;
 padding: 0;
 z-index: 30}
#sddm li
{ margin: 0;
padding: 0;
list-style: none;
float: left;
/*Font of menu top*/
font: bold 11px arial}#sddm li a
{ display: block;
margin: 0 1px 0 0;
padding: 4px 10px;
/*width of each menu top*/
width: 60px;
/*background color of main menu*/
background: #5970B2;/*text color of main menu*/
color: #FFFFFF;
text-align: center;
text-decoration: none}#sddm li a:hover
{/*background color of main menu on hover*/
background: #49A3FF}#sddm div
{ position: absolute;
visibility: hidden;
margin: 0;
padding: 0;/*background color of drop down menu */
background: #FFFFFF;
/*border of the drop down menu*/
border: 1px solid #5970B2}#sddm div a
{ position: relative;
display: block;
margin: 0;
padding: 5px 10px;
width: auto;
white-space: nowrap;
text-align: left;
text-decoration: none;
/*background color of each menu element*/
background: #FFFFFF;
/*text color of each menu element*/
color: #2875DE;
/*font of each menu element*/
font: 11px arial}#sddm div a:hover
{
/*background of each element on hover*/
background: #49A3FF;
/*font color of each menu item on hover*/
color: #FFFFFF}
</style>
<script type='text/javascript'>var timeout = 500;
var closetimer = 500;
var ddmenuitem = 0;// open hidden layer
function mopen(id)
{
// cancel close timer
mcancelclosetime();// close old layer
if(ddmenuitem) ddmenuitem.style.visibility = 'hidden';// get new layer and show it
ddmenuitem = document.getElementById(id);
ddmenuitem.style.visibility = 'visible';}
// close showed layer
function mclose()
{
if(ddmenuitem) ddmenuitem.style.visibility = 'hidden';
}// go close timer
function mclosetime()
{
closetimer = window.setTimeout(mclose, timeout);
}// cancel close timer
function mcancelclosetime()
{
if(closetimer)
{
window.clearTimeout(closetimer);
closetimer = null;
}
}// close layer when click-out
document.onclick = mclose;
</script>6. Customize the drop down menu(optional):

You can customize the menu according to your blog. This is optional and use it only if you want a different look than the one already available.
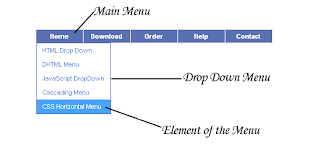
The menu consists of three sections as shown in the figure:
1. Main Menu
2. Drop Down Menu
3. Element of Drop Down Menu
In the code you will find some comments. Below the comments you have some editable code.
Here is the explanation of some of the attributes used in the code:
Background: #XXXXXX
This attribute decides the background of the part and XXXXXX is the hex code of the color. You can change the background of each of the three parts.
Color:#XXXXXX
The color attribute decides the color of the text and XXXXXX is the color hex code.
You can get color hex codes from these online color choosers
ColorSchemer
ColorPicker
width: 123 px
The width determines the width of each element. You can increase or decrease the width according to your choice.
7. Adding the Menu:
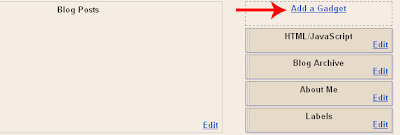
a.Go to Design>Page Elements
b.Then click on Add Gadget

c. Then select HTML/JAVASCRIPT
d.Then Add the Following code
<ul id="sddm">
 <li><a href="#"
 onmouseover="mopen('m1')"
 onmouseout="mclosetime()">Home</a>
 <div id="m1"
 onmouseover="mcancelclosetime()"
 onmouseout="mclosetime()">
 <a href="#">HTML Drop Down</a>
 <a href="#">DHTML Menu</a>
 <a href="#">JavaScript DropDown</a>
 <a href="#">Cascading Menu</a>
 <a href="#">CSS Horizontal Menu</a>
 </div>
 </li>
 <li><a href="#"
 onmouseover="mopen('m2')"
 onmouseout="mclosetime()">Download</a>
 <div id="m2"
 onmouseover="mcancelclosetime()"
 onmouseout="mclosetime()">
 <a href="#">ASP Dropdown</a>
 <a href="#">Pulldown menu</a>
 <a href="#">AJAX Drop Submenu</a>
 <a href="#">DIV Cascading Menu</a>
 </div>
 </li>
 <li><a href="#">Order</a></li>
 <li><a href="#">Help</a></li>
 <li><a href="#">Contact</a></li>
 </ul>
 <div style="clear:both"></div>
Note: Replace # by the link of the item and if you want to add the menu, say the third element.
Replace <a href=”#”>Order</a> by the following code:
<a href="#"
 onmouseover="mopen('m3')"
 onmouseout="mclosetime()">Home</a>
 <div id="m3"
 onmouseover="mcancelclosetime()"
 onmouseout="mclosetime()">
 <a href="#">HTML Drop Down</a>
 <a href="#">DHTML Menu</a>
 <a href="#">JavaScript DropDown</a>
 <a href="#">Cascading Menu</a>
 <a href="#">CSS Horizontal Menu</a>
 </div>
This is for the third menu, for the fourth replace each m3 by m4
f. Save the Gadget and the work is over. The Drop Down menu is live!
The Best Technic


