How to Easily Submit Sitemap.xml In Root Directory Blogspot

sitemap.xml.
After Looking for about sitemap.xml starting to make the sitemaps.org and upload sitemap to the root directory , all references to the read end zero. In fact, to date I have not found how to upload files to the root directory of bloggers. (Who knows wrote please .... eheheheh)

It's different if we buy their own hosting because there we can use cPanel what else to joomla, wordpress, drupal and its other.

But after trying a variety of ways it is not difficult to submit sitemap.xml on blogspot, just a touch small and sitemap.xml webmaster is accepted and no errors. 

Her main requirement is that we have a blog or website we link to Google Webmaster account, if you have not read anymore How Linking Blogs By Webmaster

After logging into Google Webmaster account, click another icon Add / Test Site , if not met, read another article above. In the box after typing the website address of the blog or sitemap.xml ago submitkan.


Obstacles will appear Especially for my friend cara.com tips that have their own domain, like me www.kiat-cara.com , we can not directly submit sitemap.xml do this, if we submit sitemap.xml to the top domain will display a message General HTTP error: 404 not foundif you do not believe try it ... eheheh ..

So what's his solution, so many similar questions arise for this.

Okay on the article How to Link Blog with Webmaster above we have discussed how to Add A Site or add a blog or website to the webmaster. To add it back to your blog which is a subdomain of blogspot, for example subdomain www.kiat-cara.com is http://thebest-technic.blogspot.com So add another blog to blogspot.com earlier. 

After we successfully added a blog before, verification also first, only then Submit it again sitemap.xml like the example above. for his www.kiat-cara.com sitemap.xml is http://thebest-technic.blogspot.com/sitemap.xml try just copy paste in browser tips cara.com, Eits ... can be downloaded on .. . eheheh ....

Make it easy submit sitemap.xml to Google Webmaster , May be useful ...


The Best Technic

How Linking Blogs by Google Webmaster

Maybe friends know that this tutorial is already so many other bloggers released by her, but because most copy and paste the article so that the article is still a lot of its shortcomings. So the purpose of this article was written to complement the lack of friends earlier, if still not added again yes .... Google Webmaster Tools is a free service the company's search engine giant, Google that allows us to monitor and optimize your blog or website.

Services This also makes it possible to ask the search engines do crawling on your blog or website and monitor the 'health' of a blog / web . Obviously it is very important benefits for the bloggers in optimizing the blog. could sign up for google webmaster main requirement is that we must first have a google account or google email, for those who do not have please register first at mail.google.com, for those who already have, let's link blog to Google webmaster us.

1. Please visit the address here Google webmaster and blogger simply login if we use gmail email, we've usually go directly to the home page Google webmaster, and our blog has existed in the list of blogs related to our email account. If no please register by clicking on the icon Add a site .

2. Click Manage site on the right side of the blog kita.pilih Add or remove users later on the icon owner click again To change or remove a site owner, please go to owner verification page .


3. Then select another menu Verify using a different method .

4. There are 4 choices of verification, you should select the method HTML tags only.

Copy the code and paste in the HTML template we should just after the code <head> . template After that save it again and then back again to the verification page and click the icon before Verify , but remember not to click on before we successfully insert code into our template earlier verification . If successful it will come out a message that we have successfully verified the blog and it is connected to the webmaster. 5. To use another feature click its icon webmaster tools or click continue , then do another step No. 2, but here we are not to verify. Notice from the menu on the left hand Configuration, Health / Health, Traffic, Optimisation / Optimization and Lab. Optimize the use of each of them. To Configuration menu are:
Settings useful for optimal targeted search our blog. If you want to optimize the visitor in Indonesia just change the target of his Geography to Indonesia. Sitelinks   should not be used in order to remain visible on search.

URL parameter is useful to define the parameters, remember if you are not sure you should not made ​​her special parameters. Change address , if we move the domain replace as an existing domain. Users and Associates just blog info only 6. For Menu Health or Health we will be given information about the health blog, what matters is the menu we optimize Fecth As Google or take as Google. Click on this option Fecth and leave the box blank in order to directly address additional to the main page of our blog. After successfully click again submit to the index . When we first began to use this feature you should select only the URL and all linked pages so that all pages of the blog will be indexed faster.

7. Now we proceed to the Traffic menu, here there's nothing we can optimize for this menu is only reporting 8. On the Menu Optimization Sitemap , add sitemap link our blog by clicking Add / Test Sitemap enter address below one by one.

atom.xml

rss.xml

feeds/posts/default

feeds / posts / default? alt = rss


Or could address other sitemap. Clicks Refresh the page if it is on the Submit it. If you see a pending means we've had success, just wait a few days and other reports will be seen, which is important not to
General HTTP error: 404 not found because it means our sitemap wrong. To Contents Keywords can be utilized as a keyword in our template settings, how ? see keywords that exist and keep on metacontent keyword in our template. But this data will appear 2-7 days after we've linked our blog to Google Webmaster, so for a new one, check again later. Google webmaster for her perhaps the most important was we do, but if you want to experiment go ahead in tooling Her other features especial ... Hopefully useful ...

The Best Technic

Tips to Make Colorful Link

With tips to create a link to change the colorful link, we can change our blog link changes color like a rainbow when the cursor / mouse pointer over a link us. Thus we can make our blog more beautiful and attractive. let's try ...


How to create colorful link:

1.     login to your blogger dashboard.
2.     Choose Design> Page Elements> Add gadget (HTML / JavaScript).
3.     Copy the code below and paste javascript gadget.
<script src='http://hbhost.googlecode.com/files/rainbow-link.js'/>
4.     Done and please diliat results.
5.     way is my friend can put this script in the template exactly above the code </ head> , go to the Edit HTML, put the script and save your template.
Good luck :-).


The Best Technic

Drop Down Menu For Blogger

Drop Down Menus are great for adding multiple links in your blog and yet they require very little space space. In addition it makes the site more user friendly and gives it a more professional look. I am going to show you how to add a customizable drop down menu to your blogger blog.
Drop Down Menu Preview:
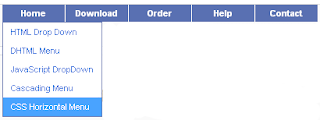
drop down menu A simple Drop Down Menu For Blogger

Follow these steps to add a drop down menu to your Blog:
1. Go to Design->Edit Html
2. Download Full Template (This is to backup your template, so that you don’t lose any data).
3. Check the Expand Widget Templates
4. Now search for the following code:
</head>
5. Just place the following code before the code above.

<style>
#sddm
{ margin: 0;
padding: 0;
z-index: 30}

#sddm li
{ margin: 0;
padding: 0;
list-style: none;
float: left;
/*Font of menu top*/
font: bold 11px arial}

#sddm li a
{ display: block;
margin: 0 1px 0 0;
padding: 4px 10px;
/*width of each menu top*/
width: 60px;
/*background color of main menu*/
background: #5970B2;

/*text color of main menu*/
color: #FFFFFF;
text-align: center;
text-decoration: none}

#sddm li a:hover
{

/*background color of main menu on hover*/
background: #49A3FF}

#sddm div
{ position: absolute;
visibility: hidden;
margin: 0;
padding: 0;

/*background color of drop down menu */
background: #FFFFFF;
/*border of the drop down menu*/
border: 1px solid #5970B2}

#sddm div a
{ position: relative;
display: block;
margin: 0;
padding: 5px 10px;
width: auto;
white-space: nowrap;
text-align: left;
text-decoration: none;
/*background color of each menu element*/
background: #FFFFFF;
/*text color of each menu element*/
color: #2875DE;
/*font of each menu element*/
font: 11px arial}

#sddm div a:hover
{
/*background of each element on hover*/
background: #49A3FF;
/*font color of each menu item on hover*/
color: #FFFFFF}
</style>
<script type='text/javascript'>

var timeout = 500;
var closetimer = 500;
var ddmenuitem = 0;

// open hidden layer
function mopen(id)
{
// cancel close timer
mcancelclosetime();

// close old layer
if(ddmenuitem) ddmenuitem.style.visibility = &#39;hidden&#39;;

// get new layer and show it
ddmenuitem = document.getElementById(id);
ddmenuitem.style.visibility = &#39;visible&#39;;

}
// close showed layer
function mclose()
{
if(ddmenuitem) ddmenuitem.style.visibility = &#39;hidden&#39;;
}

// go close timer
function mclosetime()
{
closetimer = window.setTimeout(mclose, timeout);
}

// cancel close timer
function mcancelclosetime()
{
if(closetimer)
{
window.clearTimeout(closetimer);
closetimer = null;
}
}

// close layer when click-out
document.onclick = mclose;
</script>


6. Customize the drop down menu(optional):
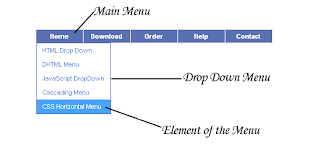
Customize Drop down menu A simple Drop Down Menu For Blogger
You can customize the menu according to your blog. This is optional and use it only if you want a different look than the one already available.
The menu consists of three sections as shown in the figure:

1. Main Menu
2. Drop Down Menu
3. Element of Drop Down Menu
In the code you will find some comments. Below the comments you have some editable code.
Here is the explanation of some of the attributes used in the code:
Background: #XXXXXX
This attribute decides the background of the part and XXXXXX is the hex code of the color. You can change the background of each of the three parts.
Color:#XXXXXX
The color attribute decides the color of the text and XXXXXX is the color hex code.
You can get color hex codes from these online color choosers

ColorSchemer
ColorPicker

width: 123 px
The width determines the width of each element. You can increase or decrease the width according to your choice.
7. Adding the Menu:
a.Go to Design>Page Elements
b.Then click on Add Gadget
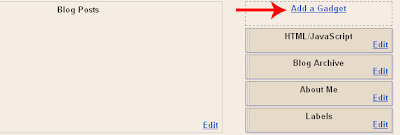
Sidebar add gadget A simple Drop Down Menu For Blogger

c. Then select HTML/JAVASCRIPT

d.Then Add the Following code

<ul id="sddm">
<li><a href="#"
onmouseover="mopen('m1')"
onmouseout="mclosetime()">Home</a>
<div id="m1"
onmouseover="mcancelclosetime()"
onmouseout="mclosetime()">
<a href="#">HTML Drop Down</a>
<a href="#">DHTML Menu</a>
<a href="#">JavaScript DropDown</a>
<a href="#">Cascading Menu</a>
<a href="#">CSS Horizontal Menu</a>
</div>
</li>
<li><a href="#"
onmouseover="mopen('m2')"
onmouseout="mclosetime()">Download</a>
<div id="m2"
onmouseover="mcancelclosetime()"
onmouseout="mclosetime()">
<a href="#">ASP Dropdown</a>
<a href="#">Pulldown menu</a>
<a href="#">AJAX Drop Submenu</a>
<a href="#">DIV Cascading Menu</a>
</div>
</li>
<li><a href="#">Order</a></li>
<li><a href="#">Help</a></li>
<li><a href="#">Contact</a></li>
</ul>
<div style="clear:both"></div>

Note: Replace # by the link of the item and if you want to add the menu, say the third element.
Replace <a href=”#”>Order</a> by the following code:
<a href="#"
onmouseover="mopen('m3')"
onmouseout="mclosetime()">Home</a>
<div id="m3"
onmouseover="mcancelclosetime()"
onmouseout="mclosetime()">
<a href="#">HTML Drop Down</a>
<a href="#">DHTML Menu</a>
<a href="#">JavaScript DropDown</a>
<a href="#">Cascading Menu</a>
<a href="#">CSS Horizontal Menu</a>
</div>


This is for the third menu, for the fourth replace each m3 by m4
f. Save the Gadget and the work is over. The Drop Down menu is live!


The Best Technic

Tips to Creating an Add to Cart PayPal button

How to turn your PayPal Website Payments Button into an "Add to Cart" button for use with PayPal's Shopping Cart.

Note: Manipulating the PayPal Website Payments button takes some familiarity with HTML. If you are not comfortable editing your HTML code by hand, please create new buttons via the Shopping Cart Button Factory.

Before you begin:

Unlike a PayPal Website Payments button, where all fields are optional, the PayPal Shopping Cart requires the item_name and amount fields. If you did not use either of these fields when you created your PayPal Website Payments button, please create new buttons via the PayPal Button Factory.

The current HTML code for your PayPal Website Payments button should look similar to this:

<form method="post" action="https://www.paypal.com/cgi-bin/webscr">
<input type="hidden" name="cmd" value="_xclick">
<input type="hidden" name="business" value="payments@yoursite.com">
<input type="hidden" name="item_name" value="Baseball Hat">
<input type="hidden" name="item_number" value="123">
<input type="hidden" name="amount" value="5,95">
<input type="hidden" name="shipping" value="1,00">
<input type="hidden" name="shipping2" value="0,50">
<input type="hidden" name="handling" value="2,00">
<input type="hidden" name="currency_code" value="USD">
<input type="hidden" name="return" value="http://www.yoursite.com/thankyou.htm">
<input type="hidden" name="undefined_quantity" value="1">
<input type="hidden" name="lc" value="ID">
<input type="image" src="http://www.paypalobjects.com/en_US/i/btn/x-click-but23.gif" border="0" name="submit" width="68" height="23" alt="Make payments with PayPal - it's fast, free and secure!">
</form>

To transform the PayPal Website Payments code above into an 'Add to Cart' button:

1. Copy your Buy Now Buttons code from your website into a text editor.

2. Add target="paypal" to the <form> tag:

<form method="post" action="https://www.paypal.com/cgi-bin/webscr" target="paypal">


3. Find this line in your code:
<input type="hidden" name="cmd" value="_xclick">


4. Replace "_xclick" with "_cart":

<input type="hidden" name="cmd" value="_cart">


5. Add the following line somewhere between the <form> tags:
<input type="hidden" name="add" value="1">


6. Find the "input type=image" line in your code:
<input type="image" src="http://www.paypalobjects.com/en_US/i/btn/x-click-but23.gif" border="0" name="submit" width="68" height="23" alt="Make payments with PayPal - it's fast, free and secure!">


7. Replace the "input type=image" line with:
<input type="image" src="http://www.paypalobjects.com/en_US/i/btn/x-click-but22.gif" border="0" name="submit" width="87" height="23" alt="Make payments with PayPal - it's fast, free and secure!">


8. Your code should now look similar to the code below:
<form method="post" action="https://www.paypal.com/cgi-bin/webscr">
<input type="hidden" name="cmd" value="_cart">
<input type="hidden" name="add" value="1">
<input type="hidden" name="business" value="payments@yoursite.com">
<input type="hidden" name="item_name" value="Baseball Hat">
<input type="hidden" name="item_number" value="123">
<input type="hidden" name="amount" value="5,95">
<input type="hidden" name="shipping" value="1,00">
<input type="hidden" name="shipping2" value="0,50">
<input type="hidden" name="handling" value="2,00 ">
<input type="hidden" name="currency_code" value="USD">
<input type="hidden" name="return" value="http://www.yoursite.com/thankyou.htm">
<input type="hidden" name="undefined_quantity" value="1">
<input type="hidden" name="lc" value="ID">
<input type="image" src="http://www.paypalobjects.com/en_US/i/btn/x-click-but22.gif" border="0" name="submit" width="87" height="23" alt="Make payments with PayPal - it's fast, free and secure!">
</form>


9. Remove the original PayPal Website Payments HTML code and paste the code you just created into your website's HTML code. A PayPal 'Add To Cart' button will appear on your website instead of your original Single Item Purchase button.

10. To complete your implementation of the PayPal Shopping Cart, you will still need to add a 'View Cart' button to your website. To create a 'View Cart' button, create a regular 'Add to Cart' button on the PayPal Shopping Cart Button Factory. On the second page of the PayPal Shopping Cart Button Factory, you will find the code for your 'View Cart' button.

The Best Technic