How to Create a Screen Saver

Screensaver blog or so-called energy saving mode is the script code that was first introduced by the movement onlineleaf campaign Environtment save green (energy efficient). The function of this script code , which is to create a website or a blog run by consuming less energy by closing the display blog while idle (quiescent with no activity) with black and dark.

Saving energy on both monitors display tube CRT, LCD and Plasma, which is a dark black color displays, why did I say dark black as black can be also produced by mixing colors from the RGB (Red-Green-Blue) that still generate electricity even though it was black. Since the purpose of energy saving mode to save energy is a means used is black black color without any mixture of RGB so I call dark black. Dark black color on the screen is produced by eliminating color-producing electric current on the screen so that by turning off the electric current, we are saving energy and reducing CO2 emissions to the consumption of electricity usage on the monitor screen. The savings made ​​were not very significant, but if multiplied by computer users all over the world ... lumayankan savings ....

Energy saving mode script code uses JQuery library so make sure a buddy put JQuery does not conflict with the script code energy saving mode. To avoid conflict of trying to use the code <script> jQuery.noConflict (); </ script> and put it in the code </ html> in your template HTML code.

Screensaver is made ​​using only onlineleaf color and simple style, because it functions made ​​for energy saving movement. In posting this article I will show screensaver version 2 with the colors and styles that can be configured in order to let more energetic and interesting, besides screensaver version 2 can be adjusted with the color theme template blog used. The curious ... What kind of screensaver sich blog is version 2 ... take a look for example at the link below:
  1. arrow-list Screensaver 01
  2. arrow-list Screensaver 02
  3. arrow-list Screensaver 03
Installation:
  • Login to yours blog ...blogger-logo-blue

  • Click on "Design" and then click "Edit HTML" checkbox then click on "Expand Widget Templates", as shown below.

    Edit-Template-Blogger

  • Find the code </ head> on template blog (press CTRL + F to display the search box in the browser and speed up the search) then copy the code below and put it on top of the code </ head> is. Placement of the code below can also be deployed as a sidebar widget or widgets upbar.

    <! - Screen Saver ->
    <script>
    ssBGImg var = "none";
    ssBGColor var = "monozcore";
    ssTextColor var = "white";
    var ssInactivity = 10000:
    var = ssImgUrl
    ssBlogName = "MonozCore";
    </ script>
    <script src='http://monozcore-project.googlecode.com/files/screensaver204b.js' type='text/javascript'>
    </ script>
    <! - End Screen Saver ->

    Blog Tools
    - Description:
    • var ssBGImg a variable to set the background image screensaver. To use the image on background please input the url image you want to use. My advice do not use images with a file size of more than 50 Kb because it would burden the blog loading time.
    • var ssBGColor is the variable for the background color. Background color can use standard HTML text colors (black, blue, yellow) or the hex code (# ffffff, # fAFb17, # 619bb99). For the background color as used MonozCore use color text "monozcore".
    • var ssTextColor a variable for color text. Color text can use standard HTML text color (black, blue, yellow) or the hex code (# ffffff, # fAFb17, # 619bb99).
    • var ssInactivity a variable for start time idle. The length of time to start the screensaver. Unit of time used in milliseconds.
    • var ssImgUrl a variable for pictures screensaver. To use the image on a screensaver please input the url image you want to use. My advice do not use images with a file size of more than 50 Kb because it would burden the blog loading time.
    • var ssBlogName a variable for the name of the blog copyright. The name that will appear on the copyright text.

  • Click "Save" and see the results ...

Have Fun....:)

The Best Technic

How to Easily Submit Sitemap.xml In Root Directory Blogspot

sitemap.xml.
After Looking for about sitemap.xml starting to make the sitemaps.org and upload sitemap to the root directory , all references to the read end zero. In fact, to date I have not found how to upload files to the root directory of bloggers. (Who knows wrote please .... eheheheh)

It's different if we buy their own hosting because there we can use cPanel what else to joomla, wordpress, drupal and its other.

But after trying a variety of ways it is not difficult to submit sitemap.xml on blogspot, just a touch small and sitemap.xml webmaster is accepted and no errors. 

Her main requirement is that we have a blog or website we link to Google Webmaster account, if you have not read anymore How Linking Blogs By Webmaster

After logging into Google Webmaster account, click another icon Add / Test Site , if not met, read another article above. In the box after typing the website address of the blog or sitemap.xml ago submitkan.


Obstacles will appear Especially for my friend cara.com tips that have their own domain, like me www.kiat-cara.com , we can not directly submit sitemap.xml do this, if we submit sitemap.xml to the top domain will display a message General HTTP error: 404 not foundif you do not believe try it ... eheheh ..

So what's his solution, so many similar questions arise for this.

Okay on the article How to Link Blog with Webmaster above we have discussed how to Add A Site or add a blog or website to the webmaster. To add it back to your blog which is a subdomain of blogspot, for example subdomain www.kiat-cara.com is http://thebest-technic.blogspot.com So add another blog to blogspot.com earlier. 

After we successfully added a blog before, verification also first, only then Submit it again sitemap.xml like the example above. for his www.kiat-cara.com sitemap.xml is http://thebest-technic.blogspot.com/sitemap.xml try just copy paste in browser tips cara.com, Eits ... can be downloaded on .. . eheheh ....

Make it easy submit sitemap.xml to Google Webmaster , May be useful ...


The Best Technic

How Linking Blogs by Google Webmaster

Maybe friends know that this tutorial is already so many other bloggers released by her, but because most copy and paste the article so that the article is still a lot of its shortcomings. So the purpose of this article was written to complement the lack of friends earlier, if still not added again yes .... Google Webmaster Tools is a free service the company's search engine giant, Google that allows us to monitor and optimize your blog or website.

Services This also makes it possible to ask the search engines do crawling on your blog or website and monitor the 'health' of a blog / web . Obviously it is very important benefits for the bloggers in optimizing the blog. could sign up for google webmaster main requirement is that we must first have a google account or google email, for those who do not have please register first at mail.google.com, for those who already have, let's link blog to Google webmaster us.

1. Please visit the address here Google webmaster and blogger simply login if we use gmail email, we've usually go directly to the home page Google webmaster, and our blog has existed in the list of blogs related to our email account. If no please register by clicking on the icon Add a site .

2. Click Manage site on the right side of the blog kita.pilih Add or remove users later on the icon owner click again To change or remove a site owner, please go to owner verification page .


3. Then select another menu Verify using a different method .

4. There are 4 choices of verification, you should select the method HTML tags only.

Copy the code and paste in the HTML template we should just after the code <head> . template After that save it again and then back again to the verification page and click the icon before Verify , but remember not to click on before we successfully insert code into our template earlier verification . If successful it will come out a message that we have successfully verified the blog and it is connected to the webmaster. 5. To use another feature click its icon webmaster tools or click continue , then do another step No. 2, but here we are not to verify. Notice from the menu on the left hand Configuration, Health / Health, Traffic, Optimisation / Optimization and Lab. Optimize the use of each of them. To Configuration menu are:
Settings useful for optimal targeted search our blog. If you want to optimize the visitor in Indonesia just change the target of his Geography to Indonesia. Sitelinks   should not be used in order to remain visible on search.

URL parameter is useful to define the parameters, remember if you are not sure you should not made ​​her special parameters. Change address , if we move the domain replace as an existing domain. Users and Associates just blog info only 6. For Menu Health or Health we will be given information about the health blog, what matters is the menu we optimize Fecth As Google or take as Google. Click on this option Fecth and leave the box blank in order to directly address additional to the main page of our blog. After successfully click again submit to the index . When we first began to use this feature you should select only the URL and all linked pages so that all pages of the blog will be indexed faster.

7. Now we proceed to the Traffic menu, here there's nothing we can optimize for this menu is only reporting 8. On the Menu Optimization Sitemap , add sitemap link our blog by clicking Add / Test Sitemap enter address below one by one.

atom.xml

rss.xml

feeds/posts/default

feeds / posts / default? alt = rss


Or could address other sitemap. Clicks Refresh the page if it is on the Submit it. If you see a pending means we've had success, just wait a few days and other reports will be seen, which is important not to
General HTTP error: 404 not found because it means our sitemap wrong. To Contents Keywords can be utilized as a keyword in our template settings, how ? see keywords that exist and keep on metacontent keyword in our template. But this data will appear 2-7 days after we've linked our blog to Google Webmaster, so for a new one, check again later. Google webmaster for her perhaps the most important was we do, but if you want to experiment go ahead in tooling Her other features especial ... Hopefully useful ...

The Best Technic

Tips to Make Colorful Link

With tips to create a link to change the colorful link, we can change our blog link changes color like a rainbow when the cursor / mouse pointer over a link us. Thus we can make our blog more beautiful and attractive. let's try ...


How to create colorful link:

1.     login to your blogger dashboard.
2.     Choose Design> Page Elements> Add gadget (HTML / JavaScript).
3.     Copy the code below and paste javascript gadget.
<script src='http://hbhost.googlecode.com/files/rainbow-link.js'/>
4.     Done and please diliat results.
5.     way is my friend can put this script in the template exactly above the code </ head> , go to the Edit HTML, put the script and save your template.
Good luck :-).


The Best Technic

Drop Down Menu For Blogger

Drop Down Menus are great for adding multiple links in your blog and yet they require very little space space. In addition it makes the site more user friendly and gives it a more professional look. I am going to show you how to add a customizable drop down menu to your blogger blog.
Drop Down Menu Preview:
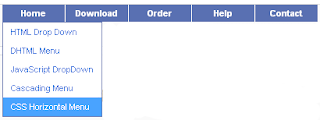
drop down menu A simple Drop Down Menu For Blogger

Follow these steps to add a drop down menu to your Blog:
1. Go to Design->Edit Html
2. Download Full Template (This is to backup your template, so that you don’t lose any data).
3. Check the Expand Widget Templates
4. Now search for the following code:
</head>
5. Just place the following code before the code above.

<style>
#sddm
{ margin: 0;
padding: 0;
z-index: 30}

#sddm li
{ margin: 0;
padding: 0;
list-style: none;
float: left;
/*Font of menu top*/
font: bold 11px arial}

#sddm li a
{ display: block;
margin: 0 1px 0 0;
padding: 4px 10px;
/*width of each menu top*/
width: 60px;
/*background color of main menu*/
background: #5970B2;

/*text color of main menu*/
color: #FFFFFF;
text-align: center;
text-decoration: none}

#sddm li a:hover
{

/*background color of main menu on hover*/
background: #49A3FF}

#sddm div
{ position: absolute;
visibility: hidden;
margin: 0;
padding: 0;

/*background color of drop down menu */
background: #FFFFFF;
/*border of the drop down menu*/
border: 1px solid #5970B2}

#sddm div a
{ position: relative;
display: block;
margin: 0;
padding: 5px 10px;
width: auto;
white-space: nowrap;
text-align: left;
text-decoration: none;
/*background color of each menu element*/
background: #FFFFFF;
/*text color of each menu element*/
color: #2875DE;
/*font of each menu element*/
font: 11px arial}

#sddm div a:hover
{
/*background of each element on hover*/
background: #49A3FF;
/*font color of each menu item on hover*/
color: #FFFFFF}
</style>
<script type='text/javascript'>

var timeout = 500;
var closetimer = 500;
var ddmenuitem = 0;

// open hidden layer
function mopen(id)
{
// cancel close timer
mcancelclosetime();

// close old layer
if(ddmenuitem) ddmenuitem.style.visibility = &#39;hidden&#39;;

// get new layer and show it
ddmenuitem = document.getElementById(id);
ddmenuitem.style.visibility = &#39;visible&#39;;

}
// close showed layer
function mclose()
{
if(ddmenuitem) ddmenuitem.style.visibility = &#39;hidden&#39;;
}

// go close timer
function mclosetime()
{
closetimer = window.setTimeout(mclose, timeout);
}

// cancel close timer
function mcancelclosetime()
{
if(closetimer)
{
window.clearTimeout(closetimer);
closetimer = null;
}
}

// close layer when click-out
document.onclick = mclose;
</script>


6. Customize the drop down menu(optional):
Customize Drop down menu A simple Drop Down Menu For Blogger
You can customize the menu according to your blog. This is optional and use it only if you want a different look than the one already available.
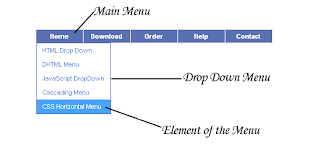
The menu consists of three sections as shown in the figure:

1. Main Menu
2. Drop Down Menu
3. Element of Drop Down Menu
In the code you will find some comments. Below the comments you have some editable code.
Here is the explanation of some of the attributes used in the code:
Background: #XXXXXX
This attribute decides the background of the part and XXXXXX is the hex code of the color. You can change the background of each of the three parts.
Color:#XXXXXX
The color attribute decides the color of the text and XXXXXX is the color hex code.
You can get color hex codes from these online color choosers

ColorSchemer
ColorPicker

width: 123 px
The width determines the width of each element. You can increase or decrease the width according to your choice.
7. Adding the Menu:
a.Go to Design>Page Elements
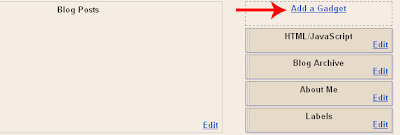
b.Then click on Add Gadget

Sidebar add gadget A simple Drop Down Menu For Blogger

c. Then select HTML/JAVASCRIPT

d.Then Add the Following code

<ul id="sddm">
<li><a href="#"
onmouseover="mopen('m1')"
onmouseout="mclosetime()">Home</a>
<div id="m1"
onmouseover="mcancelclosetime()"
onmouseout="mclosetime()">
<a href="#">HTML Drop Down</a>
<a href="#">DHTML Menu</a>
<a href="#">JavaScript DropDown</a>
<a href="#">Cascading Menu</a>
<a href="#">CSS Horizontal Menu</a>
</div>
</li>
<li><a href="#"
onmouseover="mopen('m2')"
onmouseout="mclosetime()">Download</a>
<div id="m2"
onmouseover="mcancelclosetime()"
onmouseout="mclosetime()">
<a href="#">ASP Dropdown</a>
<a href="#">Pulldown menu</a>
<a href="#">AJAX Drop Submenu</a>
<a href="#">DIV Cascading Menu</a>
</div>
</li>
<li><a href="#">Order</a></li>
<li><a href="#">Help</a></li>
<li><a href="#">Contact</a></li>
</ul>
<div style="clear:both"></div>

Note: Replace # by the link of the item and if you want to add the menu, say the third element.
Replace <a href=”#”>Order</a> by the following code:
<a href="#"
onmouseover="mopen('m3')"
onmouseout="mclosetime()">Home</a>
<div id="m3"
onmouseover="mcancelclosetime()"
onmouseout="mclosetime()">
<a href="#">HTML Drop Down</a>
<a href="#">DHTML Menu</a>
<a href="#">JavaScript DropDown</a>
<a href="#">Cascading Menu</a>
<a href="#">CSS Horizontal Menu</a>
</div>


This is for the third menu, for the fourth replace each m3 by m4
f. Save the Gadget and the work is over. The Drop Down menu is live!


The Best Technic

Tips to Creating an Add to Cart PayPal button

How to turn your PayPal Website Payments Button into an "Add to Cart" button for use with PayPal's Shopping Cart.

Note: Manipulating the PayPal Website Payments button takes some familiarity with HTML. If you are not comfortable editing your HTML code by hand, please create new buttons via the Shopping Cart Button Factory.

Before you begin:

Unlike a PayPal Website Payments button, where all fields are optional, the PayPal Shopping Cart requires the item_name and amount fields. If you did not use either of these fields when you created your PayPal Website Payments button, please create new buttons via the PayPal Button Factory.

The current HTML code for your PayPal Website Payments button should look similar to this:

<form method="post" action="https://www.paypal.com/cgi-bin/webscr">
<input type="hidden" name="cmd" value="_xclick">
<input type="hidden" name="business" value="payments@yoursite.com">
<input type="hidden" name="item_name" value="Baseball Hat">
<input type="hidden" name="item_number" value="123">
<input type="hidden" name="amount" value="5,95">
<input type="hidden" name="shipping" value="1,00">
<input type="hidden" name="shipping2" value="0,50">
<input type="hidden" name="handling" value="2,00">
<input type="hidden" name="currency_code" value="USD">
<input type="hidden" name="return" value="http://www.yoursite.com/thankyou.htm">
<input type="hidden" name="undefined_quantity" value="1">
<input type="hidden" name="lc" value="ID">
<input type="image" src="http://www.paypalobjects.com/en_US/i/btn/x-click-but23.gif" border="0" name="submit" width="68" height="23" alt="Make payments with PayPal - it's fast, free and secure!">
</form>

To transform the PayPal Website Payments code above into an 'Add to Cart' button:

1. Copy your Buy Now Buttons code from your website into a text editor.

2. Add target="paypal" to the <form> tag:

<form method="post" action="https://www.paypal.com/cgi-bin/webscr" target="paypal">


3. Find this line in your code:
<input type="hidden" name="cmd" value="_xclick">


4. Replace "_xclick" with "_cart":

<input type="hidden" name="cmd" value="_cart">


5. Add the following line somewhere between the <form> tags:
<input type="hidden" name="add" value="1">


6. Find the "input type=image" line in your code:
<input type="image" src="http://www.paypalobjects.com/en_US/i/btn/x-click-but23.gif" border="0" name="submit" width="68" height="23" alt="Make payments with PayPal - it's fast, free and secure!">


7. Replace the "input type=image" line with:
<input type="image" src="http://www.paypalobjects.com/en_US/i/btn/x-click-but22.gif" border="0" name="submit" width="87" height="23" alt="Make payments with PayPal - it's fast, free and secure!">


8. Your code should now look similar to the code below:
<form method="post" action="https://www.paypal.com/cgi-bin/webscr">
<input type="hidden" name="cmd" value="_cart">
<input type="hidden" name="add" value="1">
<input type="hidden" name="business" value="payments@yoursite.com">
<input type="hidden" name="item_name" value="Baseball Hat">
<input type="hidden" name="item_number" value="123">
<input type="hidden" name="amount" value="5,95">
<input type="hidden" name="shipping" value="1,00">
<input type="hidden" name="shipping2" value="0,50">
<input type="hidden" name="handling" value="2,00 ">
<input type="hidden" name="currency_code" value="USD">
<input type="hidden" name="return" value="http://www.yoursite.com/thankyou.htm">
<input type="hidden" name="undefined_quantity" value="1">
<input type="hidden" name="lc" value="ID">
<input type="image" src="http://www.paypalobjects.com/en_US/i/btn/x-click-but22.gif" border="0" name="submit" width="87" height="23" alt="Make payments with PayPal - it's fast, free and secure!">
</form>


9. Remove the original PayPal Website Payments HTML code and paste the code you just created into your website's HTML code. A PayPal 'Add To Cart' button will appear on your website instead of your original Single Item Purchase button.

10. To complete your implementation of the PayPal Shopping Cart, you will still need to add a 'View Cart' button to your website. To create a 'View Cart' button, create a regular 'Add to Cart' button on the PayPal Shopping Cart Button Factory. On the second page of the PayPal Shopping Cart Button Factory, you will find the code for your 'View Cart' button.

The Best Technic

Post Background Color Background Image

Different background picture for each post and each post appear in different color background. Do you know that you can have your each blog post displayed in various styles with different background colours or different background images? Yes it’s true you can show individual blog post in colored background or with different image background. Implementing this latest blogger tricks you can make your blog stand unique in various aspects. Let’s say for example, if you accept guest posts and have multiple authors contributing articles to your blog, this proves an easy way to differentiate the post appearance according to individual author. Following this blogger tips you can also make a specific post stand-out among other hundreds and thousands of posts.
Below I have explained very carefully and in plain English. I believe you will enjoy reading this blogger unique trick and work with the codes for giving your blog a unique look.
Each Post in Different Color or Different Background Images.
...............................................................................................................
Instructions to Note
...............................................................................................................
Let me also make you clear that there in no need to back up the template codes of your blog. We will not work with template instead we will go to regular create a new post option in blogger. This blogger hack is done by wrapping your Post content into a "div" element. You can apply these setting to your already published posts too and you may change, remove it at any point of time.
...............................................................................................................
Code for Changing Color of the Post Background in blogger
...............................................................................................................
<div style="background:#FFE1FF; padding:5px 8px 5px 8px;">
Your post content goes here....
</div>

Place the purple code at the end of your blog post.
Replace the part in green with your preferred color hex value.
Place the red part of the code at the beginning of your blogpost.
Make sure you replace the part in green" Your post content goes here...." with the post content.
You can also edit padding, we have added some padding so the text does not move too close of far away from the borders.

...............................................................................................................
Code for placing Background image behind Post in blogger
...............................................................................................................
<div style="background:url(URL ADDRESS OF THE PIC) no-repeat;">
Your post content goes here....
</div>

Place the purple code at the end of your blog post.
Replace the part in green with the URL of the image.
Place the red part of the code at the beginning of your blogpost.
Make sure you replace the part in green" Your post content goes here...." with the post content.
You can also edit no-repeat, we have added no-repeat, so the image does not repeat itself.
If you use repeat you can use small pattern images so that it repeats itself to cover the whole post area.

...............................................................................................................
Here's the Example on How to Place a Code:
...............................................................................................................
<div style="background:#FFE1FF; padding:5px 8px 5px 8px;">
We bring you the best in blog, blogging tricks and tips. thebest-technic.blogspot.com provides an opportunity for bloggers to come together to collaborate, learn and experience a difference. We bring you all tutorials like Earning online, templates hack, Google Adsense tricks, free blog hosting and many more. Hope this guide will help those who are finding the way around, just like me...
</div>
............................................................................................................... 
Suggestions:
...............................................................................................................
Work with the codes in EDIT HTML Post editor.
Save code in template editor in blogger settings for future use.
If you don't want to display background color or background image than you may simply remove the code by deleting the red, green and purple codes from blog post body or settings.


The Best Technic

Submit Url Add Sites Top Searchengines Free


Submit Url Add Sites Top Searchengines Free

If you are here in this page reading the post SUBMIT BLOGS TO TOP RANKING SEARCH ENGINES FOR FREE then I believe that you would also be interested in reading the post SEO. If you are interested in getting much visitors or consumers to your blog then you are in right page. You can manually submit your blogs, submit websites, submit webpages in major search engines like Google, Yahoo, Alexa, Bing and many more.
If you want web visitors to easily spot your blog, you should submit blogs to High Rated Search Engines. We have provides lists of url of several Search Engine. Click on the link provided to visit submission page directly. Now fill up the form to classify you blogs/websites.
Please take care that Search Engines will not index your blog/website if you provide wrong details. Do check once few details listed below before submitting site or adding URL to top ranking search engines.
...............................................................................................................
Searchengine Submission Do's And Dont's
...............................................................................................................
1. Make sure the Url you are submitting is correct and not broken. 
2. It contains no phonographic contents.
3. No hacking tutorials.
4. Do not submit your URL more than once a month.

(FOR MORE DETAILS PLEASE GO THROUGH TERMS AND CONDITIONS OF RESPECTIVE SEARCH ENGINES)
We offers our loyal visitors an option where they can do manual submission of their url on the major search engines which accept web sites, webpages, blogs,forums. So hurry and submit url to Bing, Submit Url to Alexa, Submit Url to Yahoo, Submit Url to Google absolutely free.

...............................................................................................................
Submit Your SiteInstantly
...............................................................................................................
 
Manually Submit Url to Top Ranking Search Engines
"BING"
SUBMIT NOW


"ALEXA"
SUBMIT NOW


"YAHOO"
SUBMIT NOW


"GOOGLE"
SUBMIT NOW

SUGGEST US
SUBMIT NOW
NOTE: Remember thousands of blogs, websites are added to different Search Engines every day, so you need to wait couple of weeks for you blogs/websites to be visible in a Search Engine's indexed. Submit the main page of your site only. The rest of your site will be crawled by the search engines.

...............................................................................................................
Other Search Engines List
...............................................................................................................
 In addition to this you can also submit your site to be listed in the below Search Engines


  • All the Web
  • Alta Vista
  • AOL
  • Beauco Up!
  • Clusty
  • CurryGuide
  • Dogpile
  • Excite
  • FamilyFriendly
  • Fazzle
  • Find Info
  • Galaxy
  • GigaBlast
  • Go.com
  • Hotbot
  • IceRocket
  • Info.com
  • InfoGrid
  • InfoSpace
  • Internet Sleuth
  • Ixquick
  • iZito
  • Kanoodle
  • Kartoo
  • Lycos
  • Mamma
  • MetaCrawler
  • MetaEureka
  • Netscape
  • One Page MultiSearch  
  • Proteus
  • ScrubtheWeb
  • Search Hippo
  • Search theWeb
  • Search.com
  • SurfWax
  • Teoma
  • Turbo10
  • WebCrawler
  • ZapMeta
  • Highway 61
  • 37.com
  • One Seek
  • MetaSpider
  • MegaGo
................................................................................................................
Website Submission Services
................................................................................................................
There are many sites on the internet offering free website submission services to search engines. We will update this page regularly keep checking.


The Best Technic

Increase Blog Traffic With Facebook Socialnetworking

Increase Blog Traffic With Facebook Socialnetworking
There are several secrets related to traffic generation mechanism with social networking websites, which most of the bloggers are putting down in words, in their blogs. Today in this tutorial I will highlight all the tricks and tips to suck the juice of web traffic generation methods.

Like Google plus and Twitter, Facebook is another important online platform that many bloggers make use to obtain some traffic to their sites. There are various opinions regarding Facebook as best traffic generation web platform along with it being high rated social networking website. Some has a belief that it is a just a matter of time, to generate enough traffic from Facebook, while others truly relies on Facebook for traffic. But I believe that once an individual or a company follows the points I have mentioned below, Facebook will start working as a charm and eventually floods of traffic will come to your way.
Face book has greater possibilities for publicizing your blog at no cost and generate free traffic for your blog. In fact, it will also take time to end up with the possibilities that Facebook delivers because once u discover one possibility another will pop up. So dear readers explore all the possibilities, take ample advantage of them and hope fully this hard effort will give you great returns in terms of enormous traffics.

Here are some latest tips that will help you turn Facebook into a traffic driving monster. Give a try and see the difference.
................................................................................................................
Your Facebook Profile Speaks
................................................................................................................
Add enough blogs materials to your profile this includes adding a link in URL, professional bio, likes, activities etc. Update Basic Information, Likes and Interests, Education and Work.
................................................................................................................
Create a Facebook Group
................................................................................................................
Create a group and add as many members as possible. Not only this, write a group description requesting your members to add their friends and families to your group. By doing this you will get a chance to pass direct update to all of your member’s notification at once with out having to type again and again. 

................................................................................................................
Add yourself to Facebook groups
................................................................................................................
Same as mention above but in this you have to search for groups of your blogs niche, with large numbers of members already included. Add as many members as possible. I have added myself to 17 Groups that includes members from 15,000 to 1500,000.

................................................................................................................
Create Your Blogs Page
................................................................................................................
This is one of the most important features of Facebook. You can show the popularity of your blog by creating plenty of likes. You will also have an option to look insight once your blog achieves 30 likes. 
................................................................................................................
Create events
................................................................................................................
A feature where you can invite your friends families relatives by creating an event, try to make good use of this for your blogs promotion.

................................................................................................................
Write Notes
................................................................................................................
My research shows that writing notes does not work too well when compare with others I have mentioned but what’s wrong in giving a try.

................................................................................................................
Frequent post update Works
................................................................................................................
If you decide to remain online without Facebook updates than you are in a chance to loose audience attraction to your profile or pages. Update your work so that you remain at the top of notification area of your friends and relatives. Try to grasp enough attention to your profile page or your works by frequent posting.
................................................................................................................
You should be active and responsive
................................................................................................................
Try to be very much responsive when some one asks you anything about the niche you are highlighting give them positive feedback who knows they are your loyal readers, if not they might turn into regular visitor after that.
................................................................................................................
Make use of Facebook applications
................................................................................................................
Applications like Networked Blogs have played a vital role in bringing traffic to websites and blogs. If you are unaware about this great application than give it a try, this really works.
................................................................................................................
Make Use of Facebook ads
................................................................................................................
If you are really serious about diverting visitors to your blog, you should think of Facebook ads. I assure you will get a fruit full results.
................................................................................................................
Other Facebook Traffic Tips and Tips
................................................................................................................
Build network
Post questions
Make use of polls
Let images speak out
Proper Username or URL
But Please, Do Not Spam

This is no rocket science so it will take time to achieve the goal and once it starts doing magic you will never have to look back again in terms of blog traffic generation methods. Till then please be patience, gradually u will see a considerable increase in traffic and more growth with passing of time…


The Best Technic

Change Default Blogger Anonymous Avatar Comments

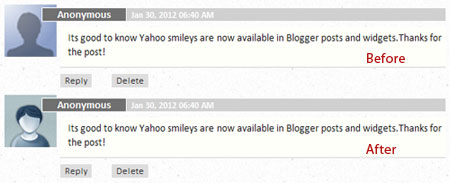
Changing Default Blogger anonymous avatar on threaded comments. After Blogger announced new feature of threaded comment, we still can costumize avatar for whose comment with 'anonymous' or 'Name/URL'. At first time Blogger using blank image http://img1.blogblog.com/img/blank.gif, so we can hack the template with background for avatar.

Now Blogger using avatar with URL  http://img1.blogblog.com/img/anon36.png, and we can't hack this image with background. But we should use jQuery script to hack this. And Let's we go... :)


change default blogger anonymous avatar

To change default Blogger anonymous avatar, follow simple steps below:

1. Go to Template -> Edit HTML

2. Find </body>
3. Add this code just before </body>

<script src='http://code.jquery.com/jquery-latest.js'/>
<script>
$("img[src='http://img1.blogblog.com/img/anon36.png']")
.attr('src', 'your-avatar-url-here')
.ssyby('blank')
</script>
4. Save

Replace the red text with your avatar URL. Or you can select below URLs to replace the link.


1. Blogger


avatar
https://blogger.googleusercontent.com/img/b/R29vZ2xl/AVvXsEjEtl2vdSIhOKj6kZq2Cnxme1XlhWguiiERCwu-NhQ4iDkE2uh_oEAjenmdZTtpn3ePQxx7uplgHFuzx6gd7pZ31ebsrW3Dbh-vi5S_PD9pLSKrrcCarSlqyXQDj93qJLEesVVmNBk6EiM/s1600/blogger2.jpg

2. Anon6


avatar
https://blogger.googleusercontent.com/img/b/R29vZ2xl/AVvXsEhUIE9FJZM6DsINMEAVhlF8qQH6vMz5IUI2JqeoOWV4IkXvPEqlqhZt96rhQ9xYROBWGDBeCyFuPq5_0iuhSVyXtH903VGv4oSONefOX8OBMB7JutAVJ_SSi4LoC40cYjlPX-8bqzM5__Q/s1600/anon6.png

3. Anon7


avatar
https://blogger.googleusercontent.com/img/b/R29vZ2xl/AVvXsEgjXzPBoiD2smAlErw8dgSivXQ80F31wr3KFtyAGE114kvzx8_YMy9T8yB2OCA8cC1r1hjBxUYBhkOEqDgjWh5Ecf_aVZnCoMqCYgwAwYoWgbsBSEtSs25bz9RVMNhVORBQKBaNwRJXd-E/s1600/anon7.jpg

Or please make own avatar :)

The Best Technic

Add Floating Facebook Like Box for Blogger

Many tutorial gives you how to add floating facebook like button. Now I came up with new tutorial for adding floating like box to blogger. This is a great way which requires almost no space and it looks more attractive than that of simply keeping the like box.
Adding Jquery Plugin
1. Sign in to Blogger
2. Go to your Dashboard>Design>Edit HTML
3. Add this code above the closing </head> tag in your HTML file:

<script src="https://ajax.googleapis.com/ajax/libs/jquery/1.6.1/jquery.min.js" type="text/javascript">
</script>
Ignore thies step if you have added Jyquery plugin to your blog.
Adding Widget Code
1. Go to Design>Add a Gadget>HTML/JavaScript
2. Add This code to HTML/JavaScript Widget


<script type="text/javascript">
//<!--
$(document).ready(function() {$(".floatinglikebox").hover(function() {$(this).stop().animate({right: "0"}, "medium");}, function() {$(this).stop().animate({right: "-250"}, "medium");}, 500);});
//-->
</script>
<style type="text/css">
.floatinglikebox{background: url("https://blogger.googleusercontent.com/img/b/R29vZ2xl/AVvXsEiscGDiBQ22fekkmNSX_u5u5jdynKiWhu5XLHcKqJ_BqQ3P5CHaJ57FbHlCpZ-foN-iAzLxmkwb4eNMhOYFyDP4W3BIjMAI4zYxRgFytpwSc9maIC8Nr7u0ii0bNAaAkbTks_utrFqU9Kw/s1600/floatingfb.png") no-repeat scroll left center transparent !important;display: block;float: right;height: 270px;padding: 0 5px 0 40px;width: 245px;z-index: 99999;position:fixed;right:-250px;top:20%;}
.floatinglikebox div{border:none;position:relative;display:block;}
.floatinglikebox span{bottom: 10px;font: 10px tahoma,verdana,arial,sans-serif;position: absolute;right: 6px;text-align: right;z-index: 99999;}
.floatinglikebox span a{color: #808080;text-decoration:none;}
.floatinglikebox span a:hover{text-decoration:underline;}
</style><div class="floatinglikebox" style=""><div><iframe src="//www.facebook.com/plugins/likebox.php?href=http%3A%2F%2Fwww.facebook.com%2Fsibarasok&amp;width=292&amp;height=258&amp;colorscheme=light&amp;show_faces=true&amp;border_color&amp;stream=false&amp;header=false" scrolling="no" frameborder="0" style="border:none; overflow:hidden; width:292px; height:258px;" allowtransparency="true"></iframe><span><a href="http://thebest-technic.blogspot.com/2012/09/add-floating-facebook-like-box-for.html" target="_blank">+Get This!</a></span></div></div>


Replace http%3A%2F%2Fwww.facebook.com%2Fsibarasok, with your Facebook fan page URL.


The Best Technic

How to Make Pan bolic (Simple Grid Antenna)


Before making a pan bolic, we must know first what it is and what its function bolic pan.


What is a Pan bolic?

  Bolic skillet is an antenna made from basic materials Pan. Bolic pans are two versions of the Antennas grid, the difference between pan bolic with Grid Antenna only lies in the materials and cost efficiency. Grid antenna / satellite TV as we know, the price is very expensive, may be 2 or 3 million-an. While the pan bolic costs only less than 200,000. With functions similar to the antenna grid, pan bolic more efficient. Bolic skillet is a radio receiver antenna with a frequency of 2.4Ghz. And another great, Frying Pan Indonesia bolic is children's work, steady right?